> For the complete documentation index, see [llms.txt](https://easify.gitbook.io/easify-box-bundle-builder-docs/llms.txt). Markdown versions of documentation pages are available by appending `.md` to page URLs; this page is available as [Markdown](https://easify.gitbook.io/easify-box-bundle-builder-docs/user-guide/box-types/predefined-box-sizes.md).
# Predefined Box Sizes
The **Predefined Box Sizes** type allows you to set up **specific box sizes** with a fixed number of items and a fixed price.
* Customers **choose their box size first** (e.g., 4-pack, 6-pack, 8-pack).
* They then **fill the box with exactly that many products**.
This format creates a shopping experience that’s both **clear for customers** and **profitable for you** — because you control price and structure while guiding buyers toward bigger, higher-value orders.
💡 Anywhere customers love **mix-and-match variety** or **buying in sets**, this box type will shine.
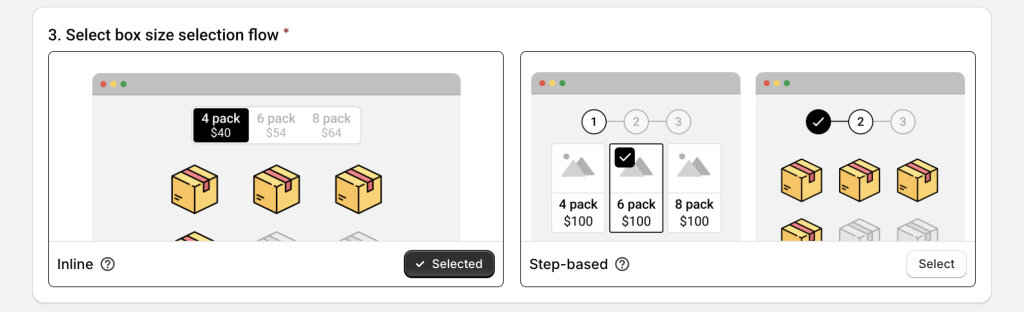
## 2 Styles of Predefined Box Sizes
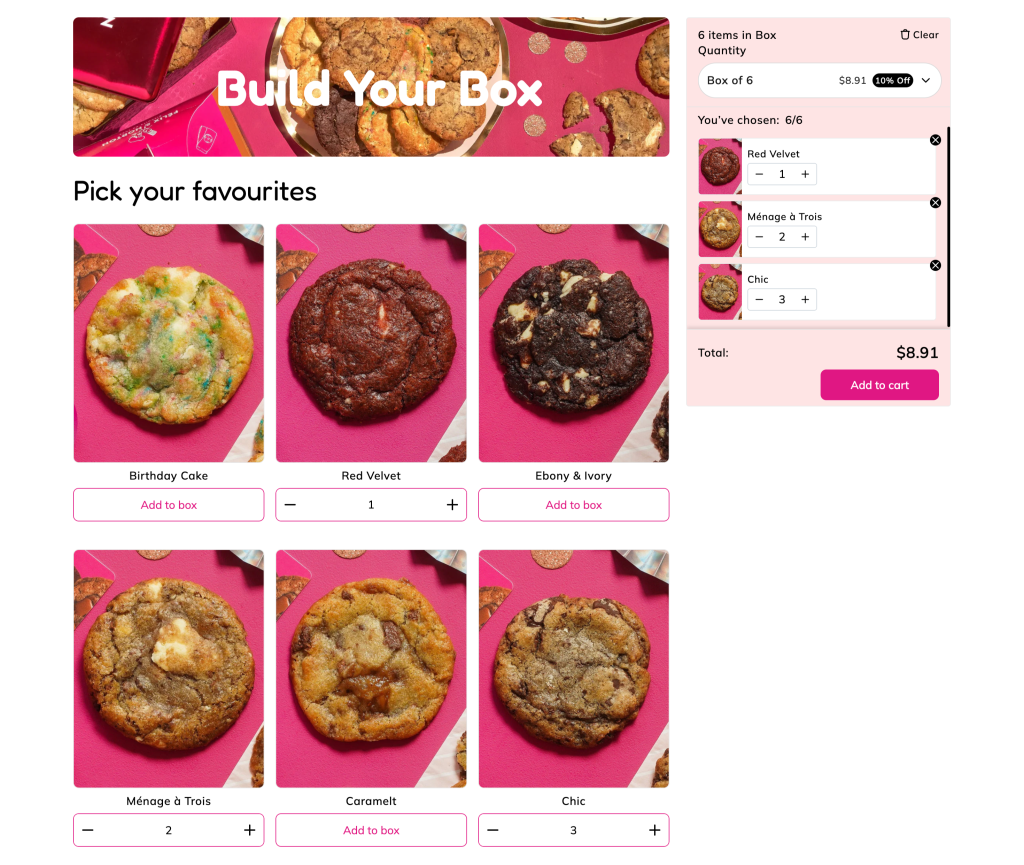
### **1. Inline (all-in-one page)**
* Box size and product selection happen on a **single page**.
* Customers can switch between sizes instantly ***without leaving the page***.
**Demos:**
* [Cookies](https://easify-box-bundle-builder.myshopify.com/products/cookies-1)
* [Soda](https://easify-box-bundle-builder.myshopify.com/products/sodas-1)
* [Smoothies](https://easify-box-bundle-builder.myshopify.com/products/smoothies-1)
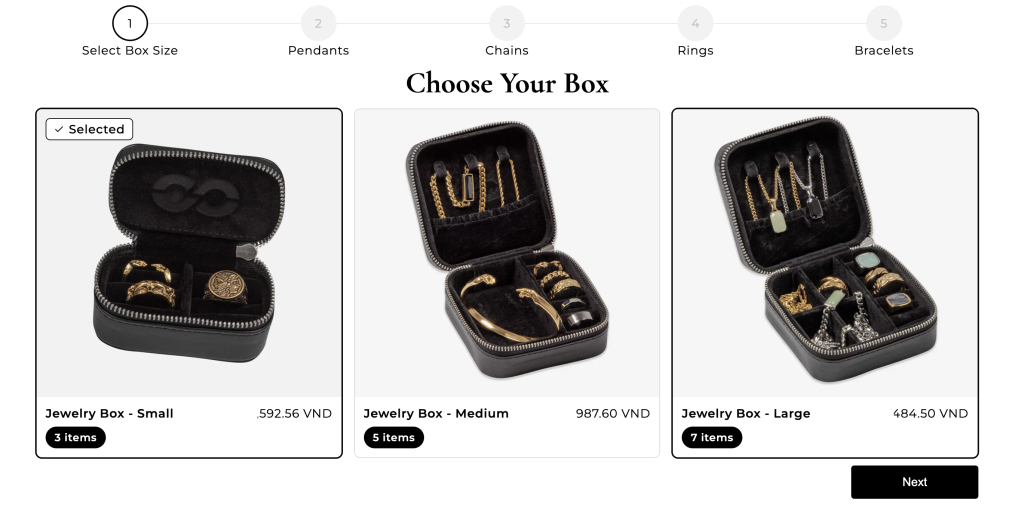
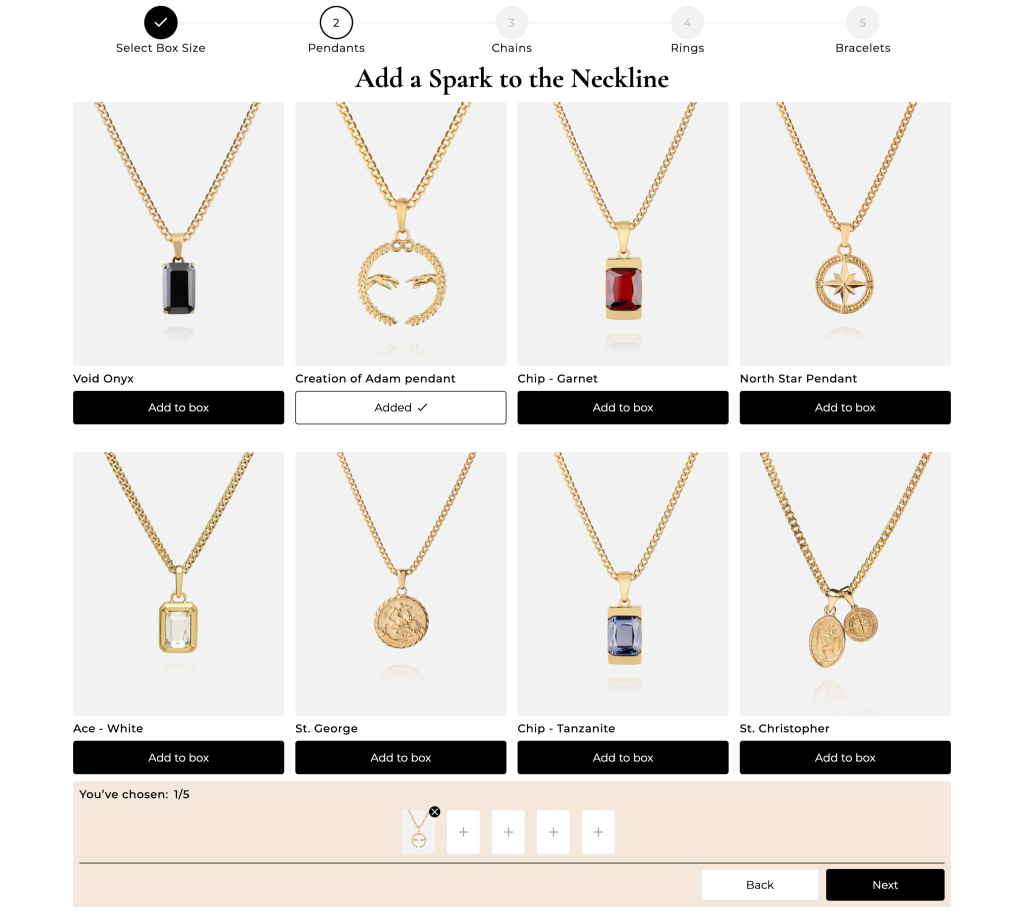
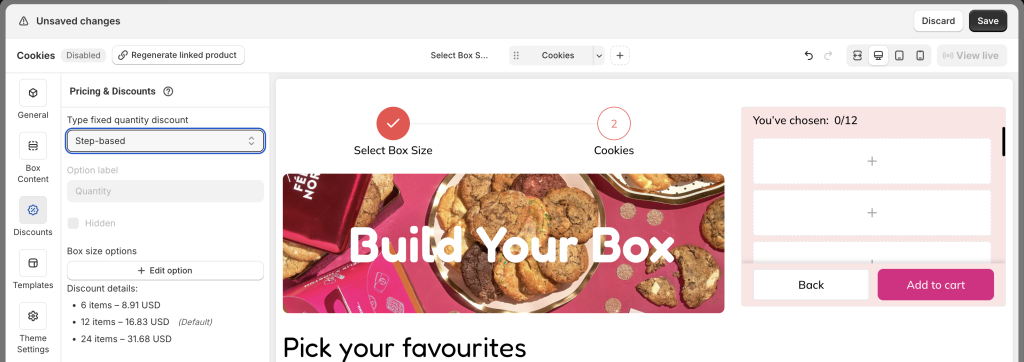
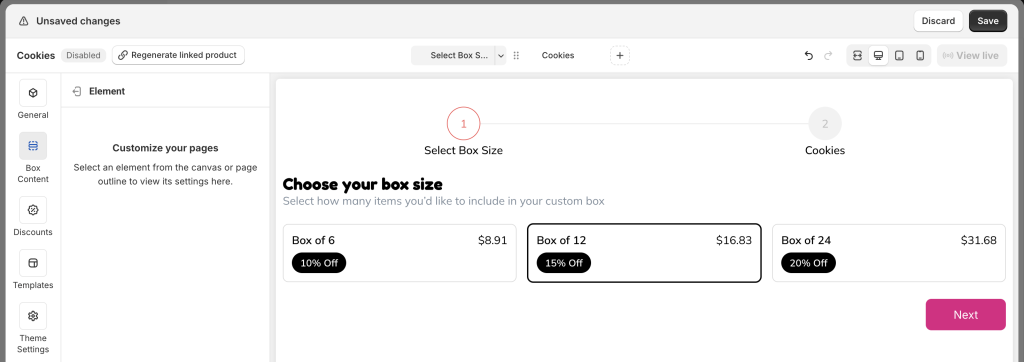
### **2. Step-based (multi-page flow)**
* Step 1: Choose a box size.
* Step 2: Fill the box.
* Changing sizes requires ***going back*** one step.
**Demos:**
* [Jewelry](https://easify-box-bundle-builder.myshopify.com/products/jewelry-1)
* [Pet treats & toys](https://easify-box-bundle-builder.myshopify.com/products/pet-treats-toys-1)
* [Cookies & bars](https://easify-box-bundle-builder.myshopify.com/products/cookies-bars-1)
## Why this box type is powerful for your store
* **Drives higher average order value (AOV**)
Customers often start with the smallest box but are easily nudged toward medium or large sizes when they see the price-per-item advantage.
*Example: 4 for $40 ($10 each) → 6 for $54 ($9 each) → 8 for $64 ($8 each).*
The bigger the box, the more savings customers feel — and the more revenue you gain.
* **Simplifies decision-making**
Instead of overwhelming customers with endless combinations, you set clear options. Fewer decisions = faster checkout = more sales.
* **Encourages volume sales**
By structuring your offer into packs, you naturally push customers to buy more than they initially planned.
* **Protects your margins**
Since you decide the price per box, you control profitability while still letting customers feel they’re getting a deal.
👉🏻 In short: Predefined Box Sizes help you **sell more, protect margins, and delight customers with a simple, rewarding shopping flow**.
## How to Create a Predefined Box in Easify
{% stepper %}
{% step %}
### **Step 1. Create a new box**
From the app navigation menu, go to **Box Management**.
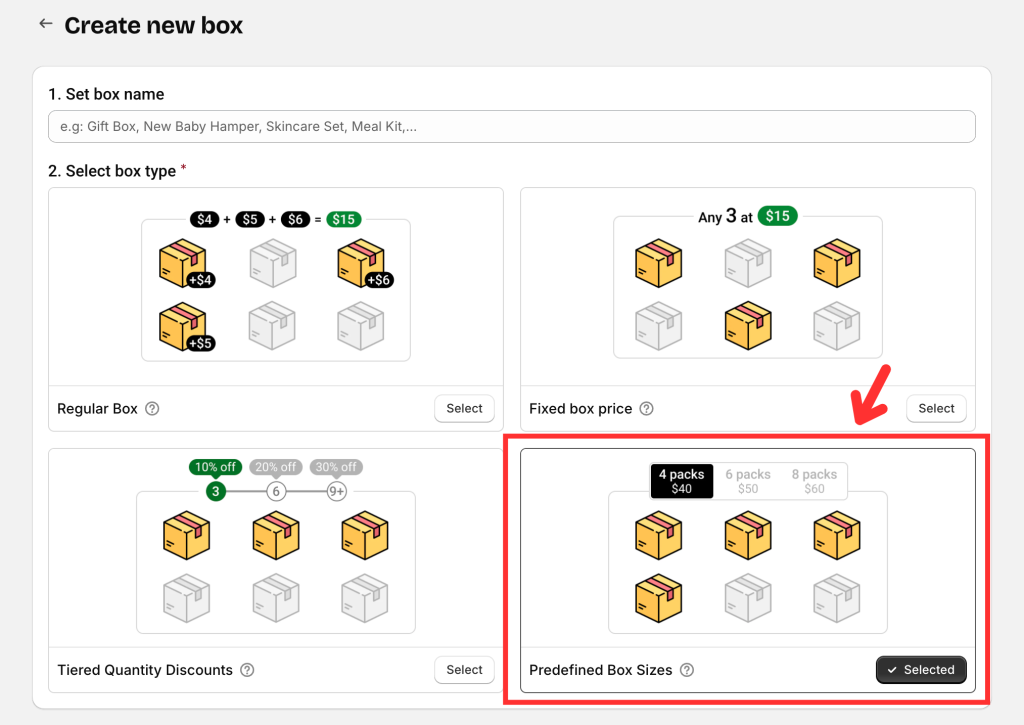
Click **Create box**. Then:
* Enter your box name.
* Select box type: **Predefined Box Sizes**.
* Choose flow: **Inline** or **Step-based** (you can switch later):
* Pick a template (recommended) or start from scratch.
* Easify includes nearly **30 templates**, with **6 built for Predefined Boxes** (3 Inline + 3 Step-based).
* Templates give you a ready-made structure so you can customize quickly.
After selecting, click **Start building** to open the Visual Editor.
{% endstep %}
{% step %}
### **Step 2. Add your box size options**
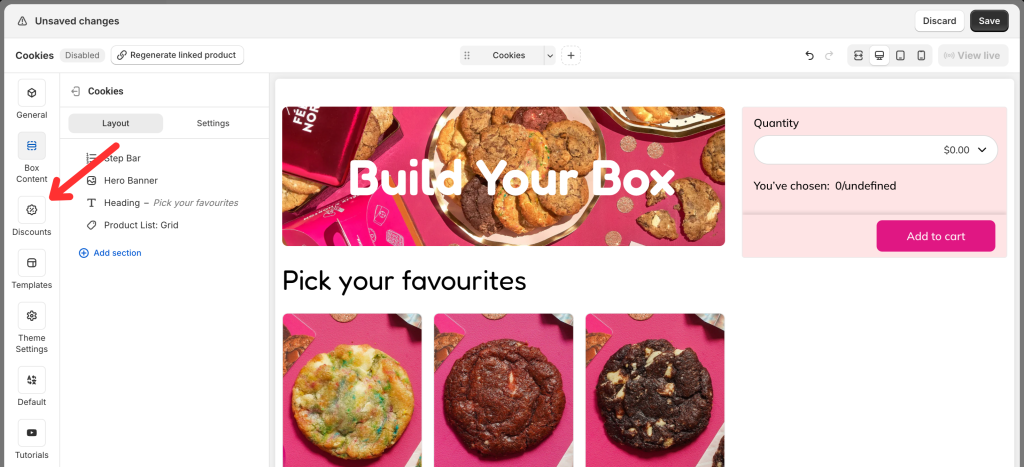
Unlike other box types, you should configure **Discounts** (box sizes) before editing page content.
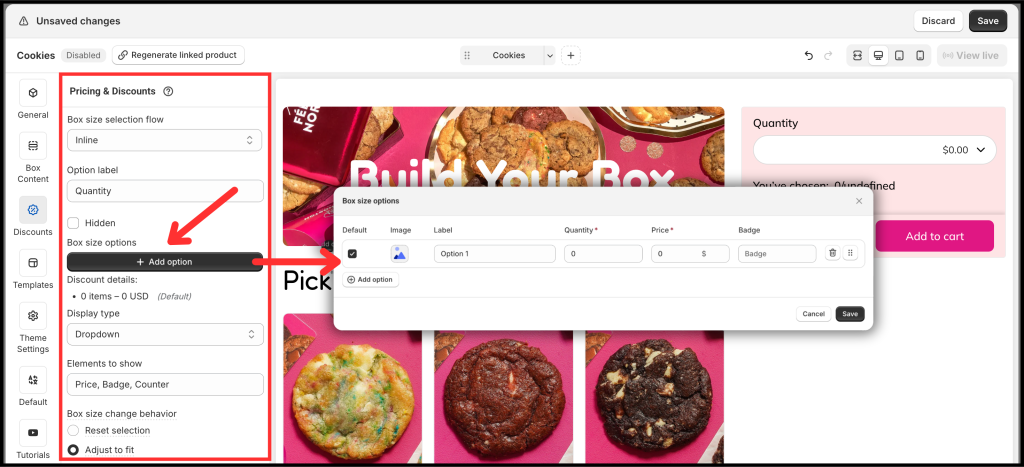
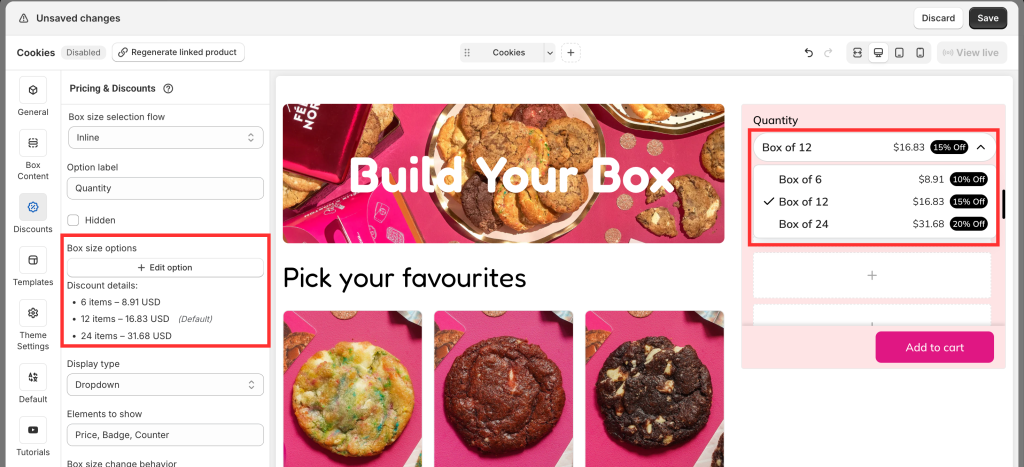
In the Visual Editor, go to **Discounts** → click **Add option**.
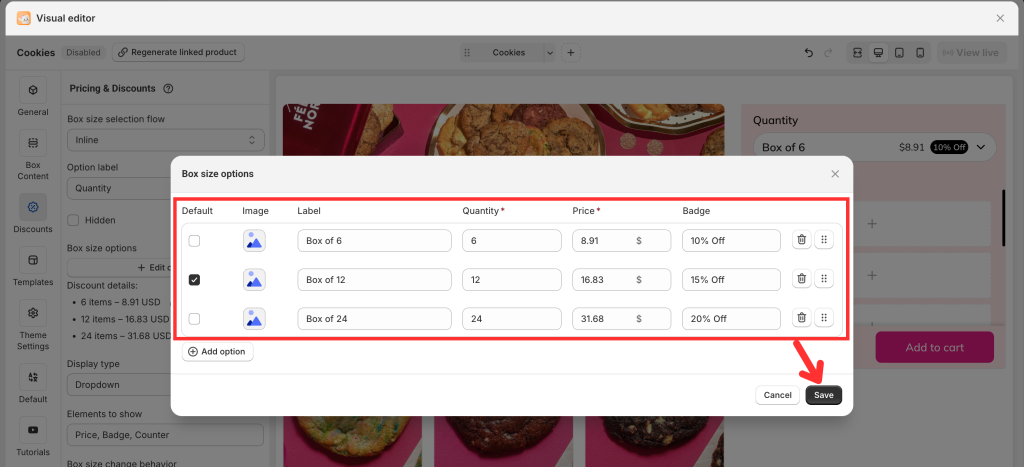
A popup will let you configure:
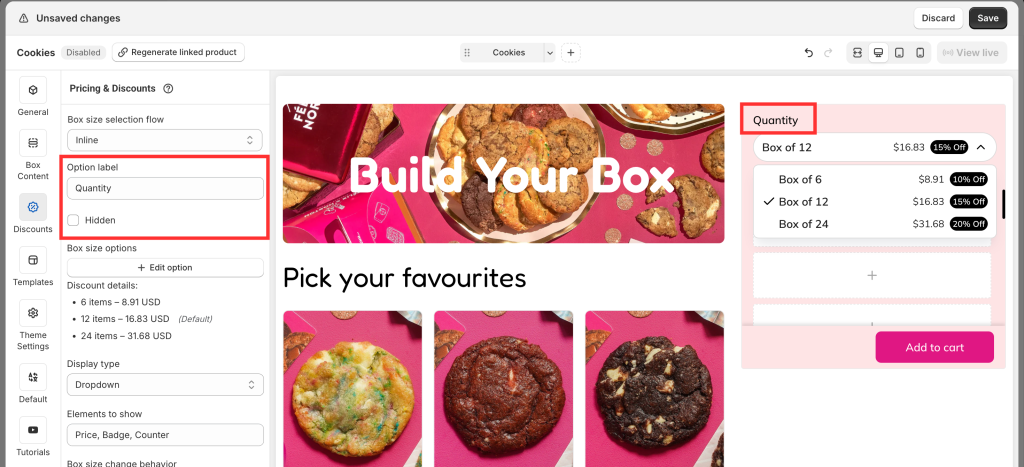
* **Label:** The label shown on your page (e.g., 4 pack, 8 pack, 12 pack).
* **Quantity:** The exact number of items customers must select for that box size. (Note: this is the fixed selection quantity, not your product inventory.)
* **Price:** The fixed price for that box size. This must be the final price customers pay (after any discount). You cannot enter a discount amount or percentage separately.
* **Badge:** This is a powerful and flexible field. You can use it to:
* Show discount values, e.g., *Save $20*, *30% off*.
* Highlight an option, e.g., *Most Popular*, *Recommended*, *Best Choice*, *Best Value*.
* Display per-unit pricing, e.g., *$4/can*, *$3.5/can*, *$3/can*. This makes it easy for customers to compare and choose the best deal.
* **Image:** For *Step-based* flow, each box size can display an image in Step 1. (Images are not supported in *Inline* flow yet.)
* **Default:** One option must be set as the default selection. We recommend selecting the mid-size box and reinforcing it with a badge.
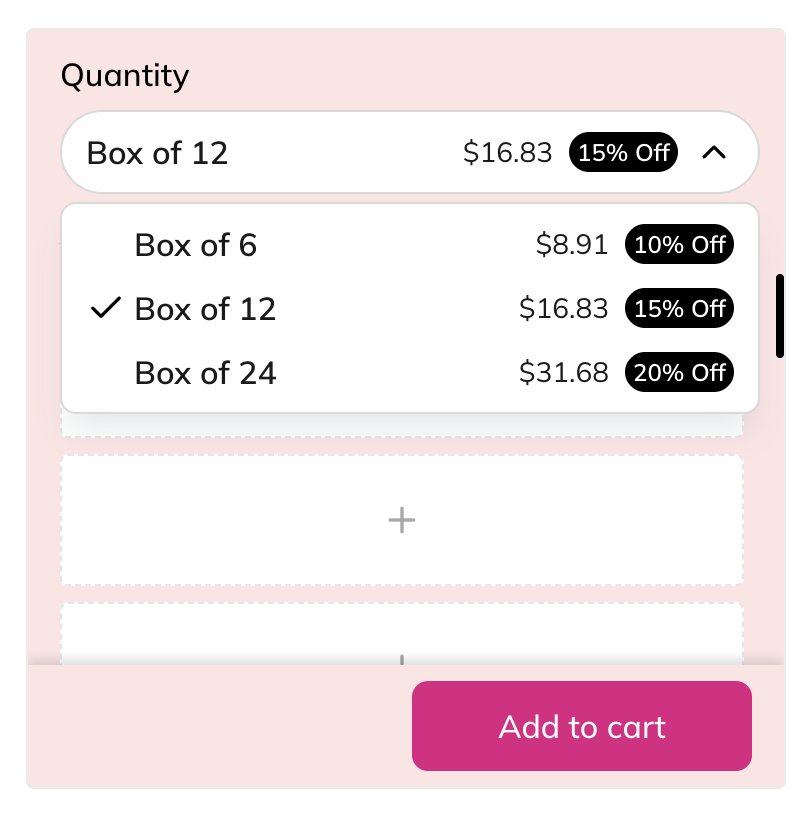
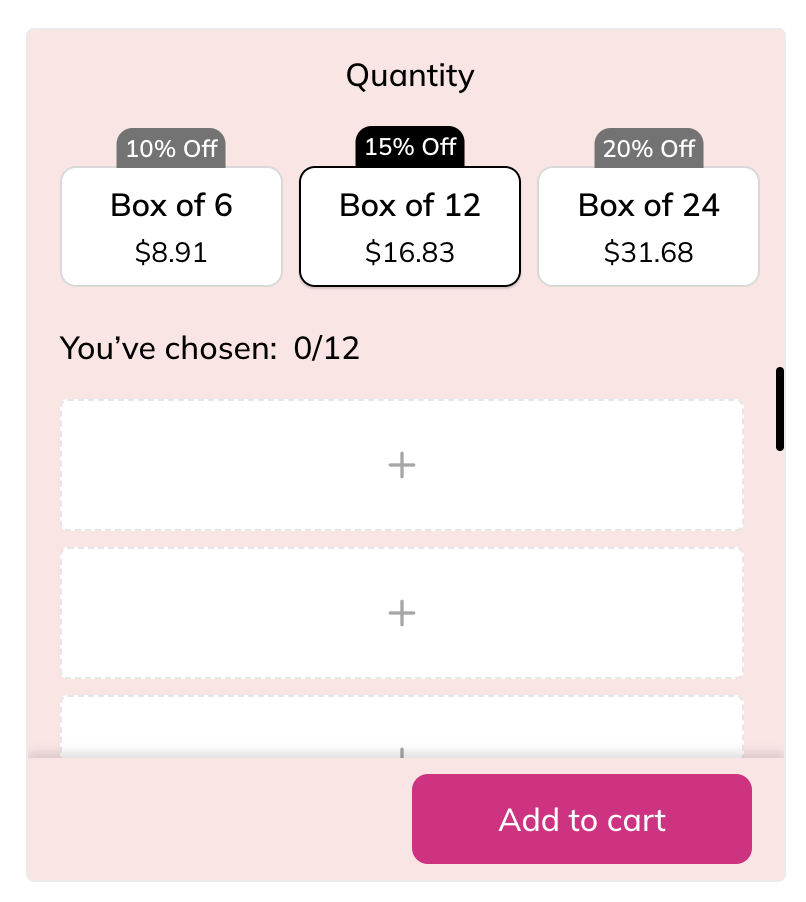
* **Display type (Inline only):** Choose Dropdown or Buttons. (Buttons are best for three or fewer options; Dropdown works better if you have more.)
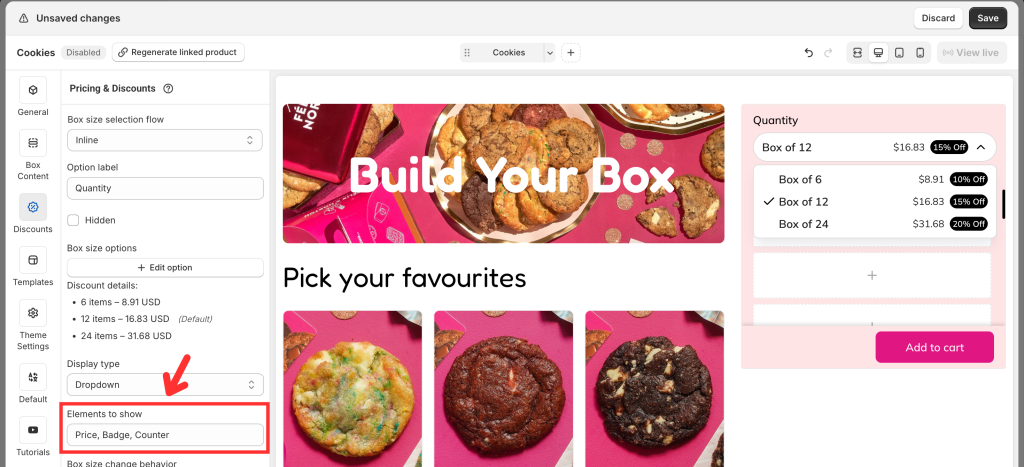
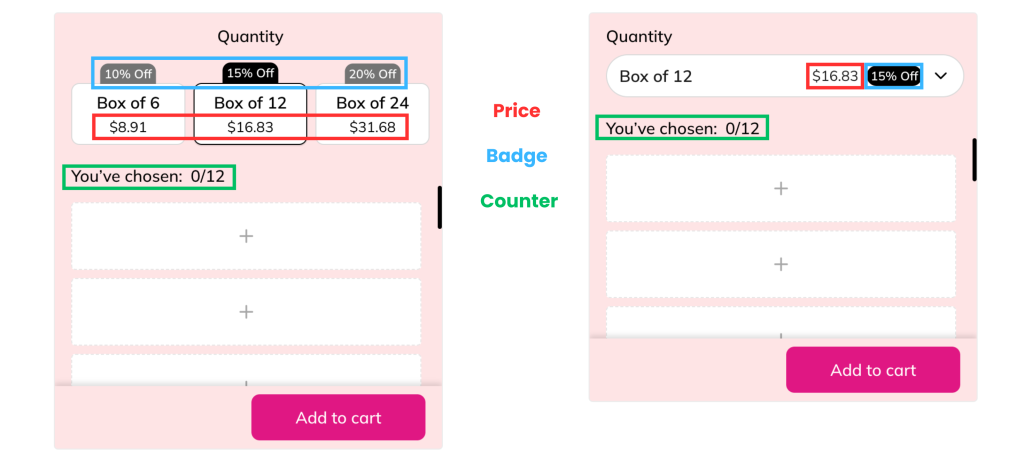
* **Elements to show:** Choose which elements to display in the box size list (price, badges, counters).
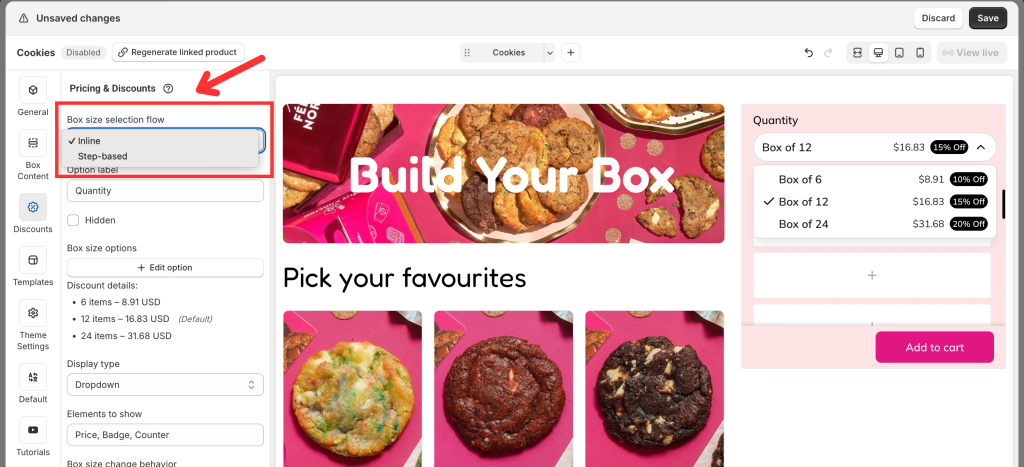
* **Box size selection flow:** You can change from *Inline* to *Step-based*, or vice versa, anytime.
The Visual Editor will update instantly:
{% endstep %}
{% step %}
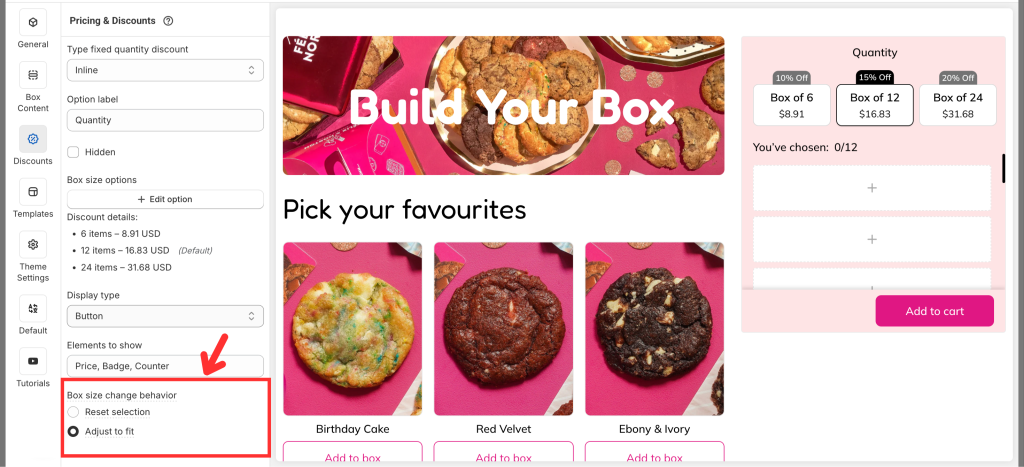
### **Step 3. Decide box size change behavior**
When customers switch from one box size to another (e.g., from Pack of 8 to Pack of 4), you need to decide how their previous selections should be handled.
*Easify gives you 2 options:*
**1. Reset selection**
* **What happens:** All items are cleared whenever the customer switches box size.
* **Example:** A customer fills 6 items in an 8-pack. If they switch to a 4-pack or 12-pack, all items are removed and they must start again.
* **Best for:**
* Premium or curated products (e.g., wine boxes, gift boxes) where the **entire selection should feel intentional**for each size.
* Stores where different box sizes are positioned as **separate experiences** (e.g., a 4-item “Starter Box” vs. an 8-item “Deluxe Box”).
* **Why use it:** It ensures customers carefully select products for each size, but it may slow down the process for those who just want to adjust their order.
**2. Adjust to fit**
* **What happens:** Keeps as many items as possible and automatically adapts the selection to the new size.
* **If switching to a smaller box:** The system trims down the selection to fit the limit (usually removing the last items added).
* Example: Customer selected 6 items in an 8-pack → switches to 4-pack → only the first 4 items remain.
* **If switching to a larger box:** All items remain, and empty slots open up for the additional items.
* Example: Customer selected 6 items in an 8-pack → switches to 12-pack → the 6 items remain, with 6 new slots available.
* **Best for:**
* Stores with larger box sizes (e.g., 6, 12, 24) where reselecting everything would be frustrating.
* Products often bought in multiples (cookies, snacks, soaps, pet treats) where customers don’t mind if a couple of items are trimmed automatically.
* **Why use it:** It creates a smoother, faster shopping experience, helping reduce drop-offs during size changes.
**👉🏻 Practical recommendation:**
* Use **Adjust to fit** if your boxes include many items or you want to make size switching effortless — this keeps the process fast and customer-friendly.
* Use **Reset selection** if each box size is marketed as a **different experience** (e.g., “Mini Box” vs. “Luxury Box”) and you want customers to consciously curate their items again.
{% endstep %}
{% step %}
### **Step 4. Customize content in the Visual Editor**
From the left menu, go to **Box Content** to edit your page.
Add sections and elements (e.g., banners) and assign products to the box.
You can switch between **Desktop, Tablet, and Mobile views** and customize what appears in each. (This is not just a responsive preview — you decide the actual layout for each device)
{% endstep %}
{% step %}
### **Step 5. Refine the design**
From the left menu, go to **Theme Settings** to adjust page style.
Customize layout width, typography, product cards, step bar, colors, and more to match your store branding.
{% endstep %}
{% step %}
### **Step 6. Finalize and publish**
In the **General tab**, enable the box page.
* Define the box page URL.
* Add a box image (displayed on the box review page, cart, and checkout).
* Save and publish to your storefront.
{% endstep %}
{% endstepper %}
## Advanced Tips to Maximize Profits with Predefined Box Sizes
### **1. Offer 3 sizes (small, medium, large)**
* **Why:** Behavioral economics shows customers often avoid extremes (“too small” or “too expensive”) and settle on the middle choice — known as the **center-stage effect**.
* **Proven effect:** Merchants consistently see **60–70% of sales land in the mid-tier box** when it’s positioned as the “sweet spot”.
* **Example:** A chocolate store offers 6 truffles for $20, 12 for $35, 24 for $60. Most buyers pick 12 — not the cheapest, not the priciest, but best perceived value.
👉🏻 Use Easify badges like **“Most Popular”** on the mid-tier to reinforce this effect.
### **2. Price larger boxes with clear savings per item**
**Why:** Shoppers are very sensitive to “price per unit.” If you make the math obvious, they feel smarter buying more. Large box adoption jumps when savings are 15–25% compared to the smallest box.
**Example:**
* Pack of 4 cookies → $10 each
* Pack of 6 cookies → $9 each (10% savings)
* Pack of 12 cookies → $7.50 each (25% savings)\
The 12-pack becomes irresistible because customers *see the deal*.
👉🏻 Add “Save 25%” labels directly under the box size for instant impact.
### **3. Use badges & social proof strategically**
**Why:** Labels like “Best Value” or “Customer Favorite” guide decisions faster than long descriptions. They tap into **decision shortcut psychology**. Shopify studies show highlighting one option as “most popular” can increase its selection rate by **up to 40%**.
**Example:** A tea shop marked its 20-bag box as “Most Popular”. Despite offering 10 and 40, the 20-bag option dominated sales (70% of orders).
👉🏻 In Easify, apply badges to your mid or large box to push customers where you want them.
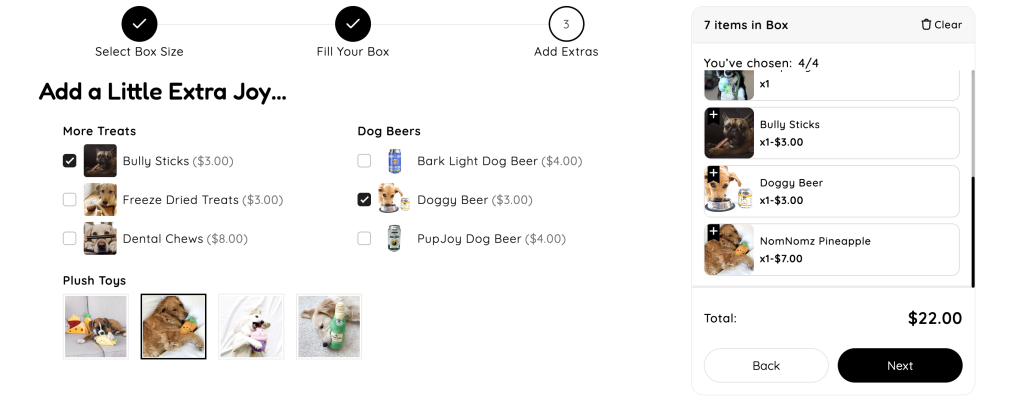
### **4. Add upsells after box selection**
**Why:** Once customers commit to a box, they’re in “shopping momentum”. Offering extras feels natural and adds incremental revenue.
**Example:** A pet shop offered “+1 surprise toy for $7” after customers filled a 6-item treat box. Over 25% of buyers clicked yes — pure profit, no extra acquisition cost.
👉🏻 Use Easify’s Custom fields and add-on product feature to layer revenue on top of your box sizes. Demo:
### **5. Test & optimize using real data**
**Why:** The ideal box size and pricing strategy isn’t based on guesswork — it’s uncovered through testing and tracking customer behavior.
**Example test ideas:**
* Compare **3 vs. 4 size tiers**: Does offering an extra option increase sales or cause confusion?
* Experiment with **different price gaps**: For example, $40 → $54 vs. $40 → $50. Which balance drives more upgrades?
* **Rotate the “Most Popular” badge**: See how highlighting different options influences customer choices.
👉🏻 For now, you can test these manually by running each setup during a specific time period and measuring the results.
> In the future, Easify will include a built-in **A/B testing feature** to make this process easier and more precise — stay tuned! If you’d like to see this feature released sooner, please [share your ideas and requests](https://easifyapps.com/feature-request-bb/) with us. Your feedback helps us shape Easify to match your real needs.
## Final takeaway
Predefined Box Sizes aren’t just a way to bundle — they’re a **profit strategy backed by consumer psychology**:
* Customers feel in control (they choose the size).
* You control margins (fixed box pricing).
* Anchoring, badges, and upsells subtly nudge them toward bigger baskets.
✅When applied well, this box type transforms average orders into **high-value, repeatable sales** — perfect for any Shopify store that thrives on volume, variety, or gifting.
## Need Help?
Questions? Stuck somewhere?
We’re always here to help! Just reach out via our **in-app live chat** for 24/7 support.